
When working on my World of Warcraft addon I wondered if it would make sense to have some help to maintain the database. One of the solutions was to host a small website to allow editing the data for the addon. But this is only a small addon, I didn’t want to have a huge project to maintain, I’d prefer to keep it simple and I didn’t want to spend money in it. So I wandered on the web and found out about the MERN stack. If you are more than 30 years old (like me) you might remember WAMP and LAMP which provided easy solution to host a website using Apache, MySQL and PHP on Linux or Windows back in the early 2000s. The MERN stack is a bit like WAMP and stands for Mongo/Express/React/Node because we now live in 2021 and everything can be JavaScript.
So follow me into my journey with MERN on Azure (with a bit of Github)
Introducing MERN
As I said MERN means :
1
2
3
4
M.ongo
E.xpress
R.eact
N.ode
If you are not used to these let me introduce them a bit
MongoDb is a document oriented database where document are JSON-like objects. It is quite popular and is available as a fully managed database in the cloud with MongoDB Atlas. It is provided under SSPL licencing thus part of the open-source ecosystem.
Express is a simple application framework for Node.js designed for web application and API’s. Express is open-sources, provided under MIT licencing on Github.
React is… well it is quite known but if you really don’t know it React is a JavaScript framework for client side web application. It is maintained by Facebook and also provided as an open source software under MIT licencing.
Node is an open source under a permisive MIT licence JavaScript runtime environment which allow server-side scripting, this is where Express will be executed.
In this article I will use an online todo application which will store and retrieve the data from a distant database. This will allow us to take a easy to understand use-case covering all part of the stack.
You can get the code of the project on Github Ciaanh/Mern.
How it all work together
We are using Node and Express to expose a React app which interact with an API retrieving and storing data in a Mongo database. That’s quite simple and as all is written in JavaScript, so no need to worry about several languages to master.
But the Node server needs to be hosted somewhere… Let’s arbitrarily put the code on Github and use Azure to host the server, we will be able to use the Github actions to configure our CI (Continuous Integration).
One of the main goal will be to host the API and the front app together on the same server and having both deployed at the same time. This might not be the best solution for large scale applications but it has the advantage to be really fast and easy for small project and to prevent us from the headache of handling CORS between our front and API.
As I said I decided to implement a really simple Todo app as it cover the basic use-case you might encounter (read, write, update…). Let’s take the example of the action of adding a new todo item to the list.
- The client (aka React application) has a button with a handler function which calls an API endpoint with the data we want to store.
- The API call is made in the React application using Axios.
- The API endpoint is declared on the server using Express as a POST. The handler function’s job is to deserialize the data (JSON) then store everything in our database.
- The interaction with our database is made using Mongoose a javascript ORM to access our Comsos DB.
Having said that we need to take a closer look at different aspects of the project as I faced several issues while trying to make everything work together.
Making it work in theory
You probably already know how to create a repository on Github and configure the local project so let’s take a look at how the project is structured.
Packing it all together : a Node project
The main idea is to have a main node project to host a server wich expose an API and also serve a React application. The package.json file is the way we explain to Node.js how our application is intented to be executed, for that purpose we define the following scripts :
1
2
3
4
5
"start": "node server",
"server": "nodemon server",
"client": "npm start --prefix client",
"dev": "concurrently \"npm run server\" \"npm run client\"",
"build": "npm install && cd client && npm install && npm run build"
And for a better understanding :
- the
startscript is the default entry point for our application on a production evironment. - the
serverscript use “nodemon” to watch for file changes and automaticaly reload the server. - the
clientscript launch the client app by executing the start script from thepackage.jsonlocated in the client folder - the
devscript allow use to launch both the server and client for development purpose, this is done usingconcurrentlyto launch theserverandclientscripts. - the
buildscript describe how our application is intented to be built, installing dependancies for the server then installing dependancies and building the client.
We have also defined that the entry point of the project is the server.js file which contains the handler for the Http requests.
An Express Server
The first thing you’ll notice in the server.js file, as for every JavaScript project, is that we import our libraries
1
2
3
4
5
6
require("dotenv").config();
const express = require("express");
const ReadPreference = require("mongodb").ReadPreference;
const mongoose = require("mongoose");
const cors = require("cors");
const path = require("path");
To this end we have a Node project using the following libraries :
- dotenv : usefull package to load environment variables from a file or the Azure App Service application settings. As for any application we need to have some configuration at least to contain the connection string to the database and not have it stored directly in our code.
- express : the web framework to implement the API and serve the React application.
- mongoose : an ORM for a Mongo database, in our case a Cosmos DB in Azure with Mongo DB API.
- cors : usefull middleware for express to prevent CORS issue for our requests especially during development.
- path : a library to ease the manipulation of paths, in our case allow us to resolve the path to the React application file we will serve.
As mentionned , dotenv allow us to have .env file in our development environment and then access the environment variables in our production environment. Usage of these variables is really simple :
1
const { DB_CONN } = process.env;
In a development environment we would only have to create at the root of our project a .env file containing the list of environment variales we would have, we just have to be careful to add the .env file in our .gitignore file to prevent it to be commited. Here is the content of the .env file :
1
2
PORT=5000
DB_CONN=mongodb://xxxxxxxxxxxxxxxxxxxxxxxxxxxxxxxxxxxxxxxxxxxxxxxxxxxxxxxxxxxxxxxxxxxxxxxxxxxxxxxxxx
Express is quite easy to use and we can configure several middlewares with the use() function :
1
2
3
4
const api = express();
api.use(cors()); // enable CORS on all our requests
api.use(express.json()); // parses incoming requests with JSON payloads
api.use(express.urlencoded({ extended: false })); // parses incoming requests with urlencoded payloads
Obviously we need a way to connect our database and this is done using Mongoose as stated previously.
1
2
3
4
mongoose
    .connect(DB_CONN, { useNewUrlParser: true, useUnifiedTopology: true })
    .then(() => console.log("DB connection successful"))
    .catch(console.error);
But connecting to the database is not enough as we have to declare the data model that we will use to store the Todo items. Mongoose offers a lot of possibilities for that as you can see if you explore their documentation, and in our case the data model is really simple as we will only need a text field and a boolean to know if the item is done or not.
1
2
3
4
5
6
7
const ToDoModel = mongoose.model(
    "todo",
    new mongoose.Schema({
        isDone: Boolean,
        text: String,
    })
);
Regarding the configuration of our Express server we should distinguish the two different behavior we expect from our API
1. expose our API endpoints to add, remove, edit or delete items from our list
To declare a route with Express we only need to associate an Http verb with a path and a function which will handle the request. For the creation of list item we have a handler for a POST request on the /todo path. As we previously told express to use the JSON middleware, the body of the request is automatically parsed to JSON, we then can tell Mongoose to create a new object using the data model previously defined. As Mongoose is promise based, once our save request has been processed we can notify Express of the result using the result function provided.
1
2
3
4
5
6
7
8
9
10
11
12
13
14
15
api.post("/todo", (req, res) => {
  const { todo } = req.body;

  todo._id = new mongoose.Types.ObjectId(); // mongoose does not resolve automatically ids for new objects
  const newTodo = new ToDoModel(todo);

  newTodo
    .save()
    .then((newTodo) => {
      res.json(newTodo);
    })
    .catch((err) => {
      res.status(400).send(err);
    });
});
And it’s that simple for all our endpoints, a route, a verb and a handler to process the request.
2. serve the static files from client (ie our react app)
The API and the client application are hosted together but when a request is sent to our App Service only the Node application and Express are handling it. So we need to tell Express that GET requests on the root path (which are not handled by a previously configured route) should return static files from our React application. This is as simple as specifying that we use the static Express middleware and declare that GET requests return the client/build/index.html file which is the default page of our React application.
1
2
3
4
api.use(express.static(path.join(__dirname, "client", "build")));
api.get("/*", (req, res) => {
  res.sendFile(path.join(__dirname, "client", "build", "index.html"));
});
One last thing to be carefull to is the port to listen to. Once again we can use the environment variable (and our .env file) to define the value for Express.
1
2
const port = process.env.PORT || 5000;
api.listen(port);
When using the npm run dev command you will notice that the server runs on this port and can serve the client application but live reload and React dev tools will not work this way, this is why we used concurently. When using the npm run dev command, the React app is started directly and served on the default React devolpment port (by default on port 3000) for testing and debugging.
Into the React Application
The React application located in the client folder is a full React project nested in the existing one. You have nothing specific to configure except for the .env file which might be needed to store environment variables dedicated to the React application.
Regarding how the React application is structured there is nothing fancy neither, we use several function components to handle the list and the list items, the data are stored in the State using React.useState([]) and the communication with the server part is made using axios, a promise-based Http client.
You might notice that axios is configured differently if the environment variable REACT_APP_API_BASE_URL is defined or not, this is done to specify the base URL to use for request in a development environment, the client folder contains a .env file with the following configuration : REACT_APP_API_BASE_URL=http://localhost:5000
One part which can also be tricky is how to handle the initial loading of data, in order to do this we simply use React’s useEffect(() => { /* effect */ }, [ /* dependancy */ ]), a hook which run the provided function for every change on its dependancies. In our case as we pass an empty array as dependancies, the effect will run only once. If no array was to be provided the effect would run on every render, if the stats was provided it would be ran every time the state change and so on. More details can be found on the W3Schools page.
Making it work for real : the continuous integration
With a complete project including the server API and the React client, the only thing left to do is to release it.
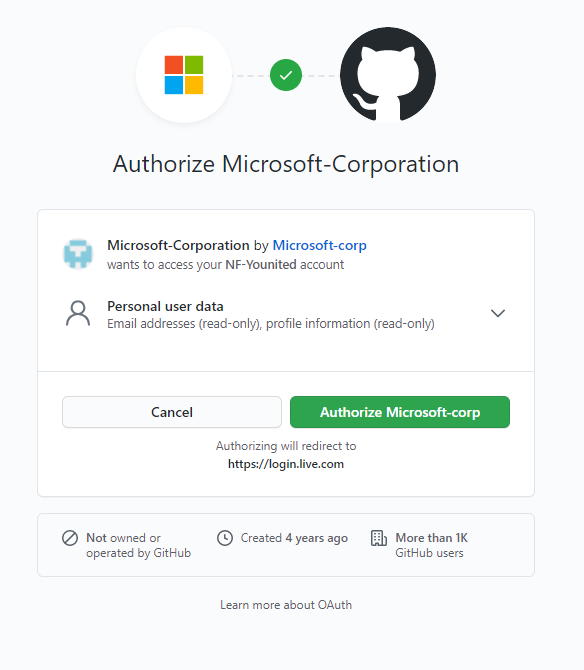
As I realy like Github, the first thing to do is to create a repo where you will push your project. Then we go to the Azure portal and (if you don’t already have one) create an account. As Github has been recently aquired by Microsoft you can use a Github account to access the Azure portal and it is higly recommended as it will simplify the setup of the CI.
If you are creating a new account you will be informed that you have no subscribtion and you will be able to choose a free trying period which offers 200$ credit and 12 months of free services (Azure Free offer)
To host our application we will need an App Service Web App and a Cosmos database.
- App Service is a hosting service which support a large choice of application technologies such as .Net, Java, Python, PHP and the one we are using Node.js
- Cosmos db is a NoSQL database service which can be accessed using the MongoDB API, it will replace the MongoDB part on Azure.
For both services Azure offers a “free tier” which will allow us to test our application without having to pay anything. One remark though, being “free” implies there is some limitations, one of them is that you will not be able to activate the “Always on” option. Your Web App virtual machine will be recycle if not used for a certain period of time and will take some time to “wake up” when used again. Don’t be surprised if you app is not always accessible.
Now let’s create and configure everything.
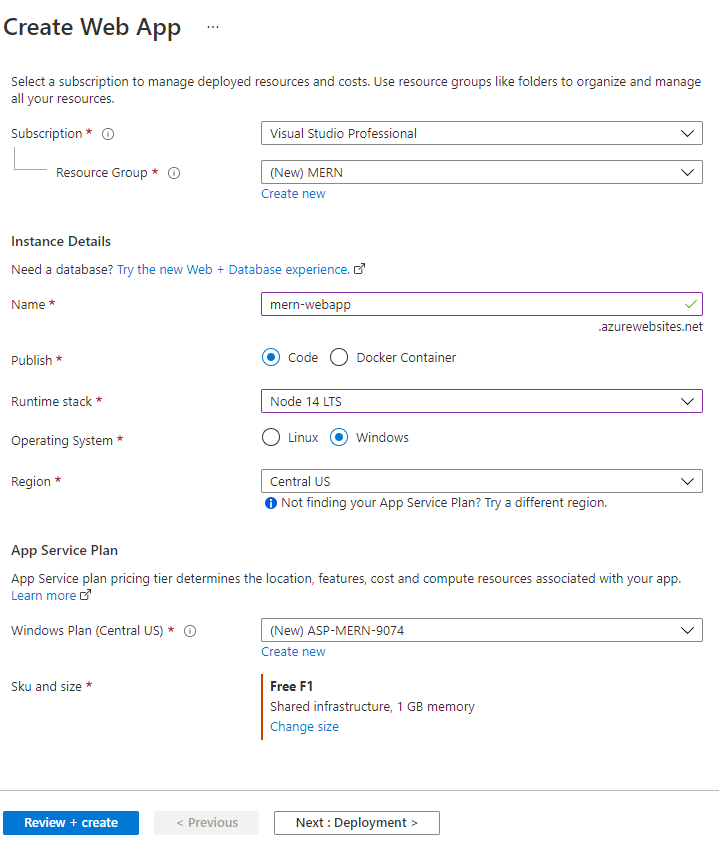
1. App Service
On the home click on the App Services icon then choose create

Fill in the form and choose Node 14 runtime stack and windows hosting to be able to use Free F1 sku. If needed create a new resource group We won’t set up the continuous delivery now so click review+create and finalize the creation.
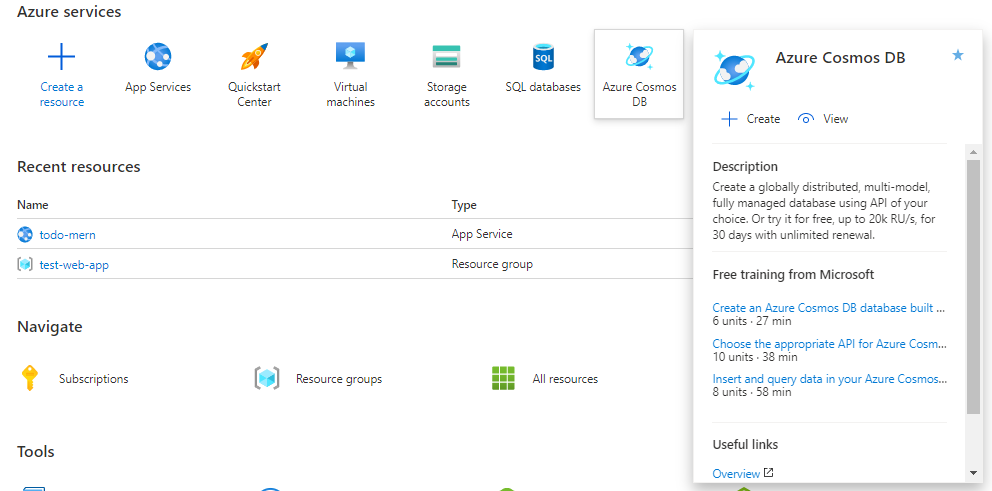
2. Cosmos DB
Next we will create the Azure Cosmos DB API for MongoDB by clicking the Comos DB icon on the home screen (or type cosmos in the search bar).
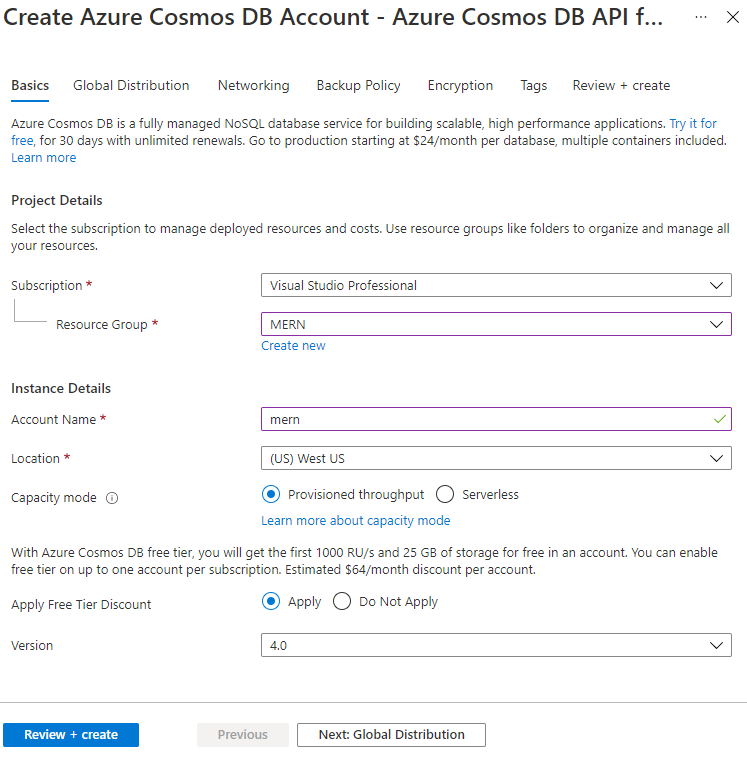
Select the resource group created with the App Service. As we are aiming for low cost check that Provisioned throughput is selected as well as Apply Free Tier Discount (details here). You can navigate the other options but we are ready for creation as is.
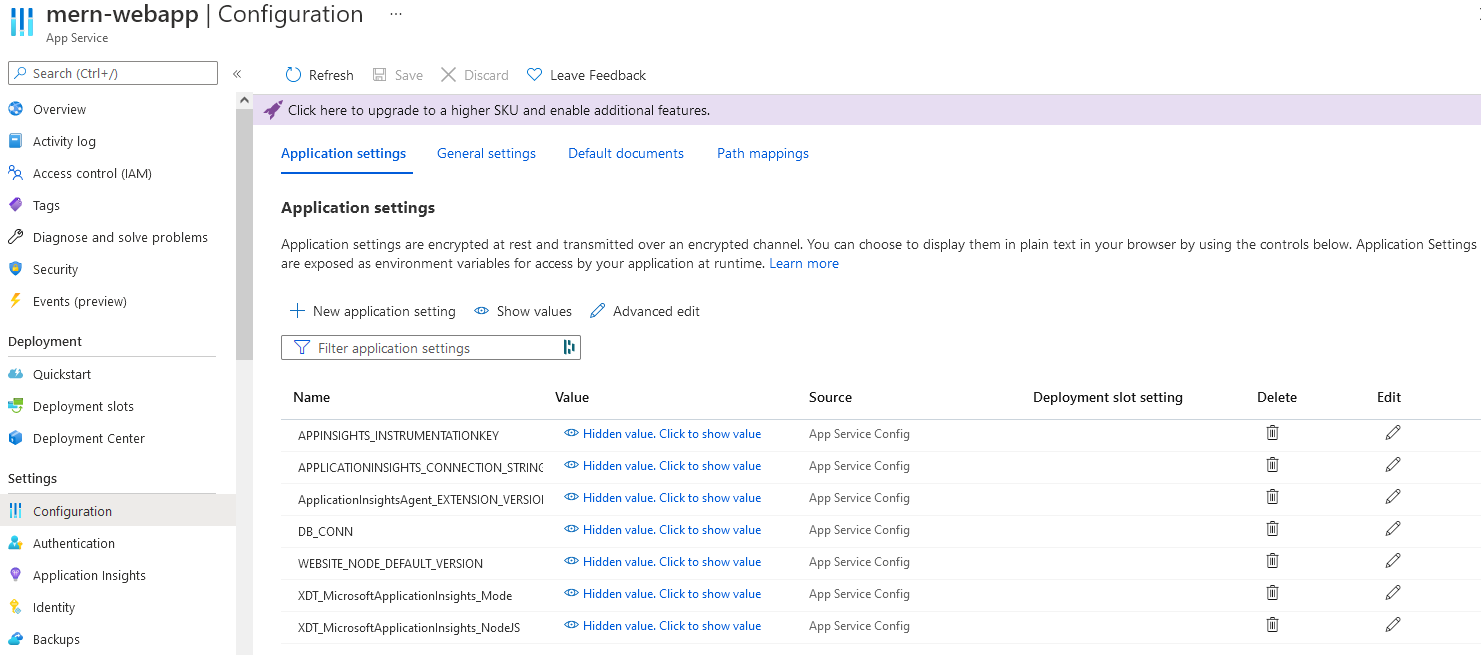
When we will create our application we will access our database from our Web App so we need to add a configuration variable in our Application Settings to store the connection string to our database. Browse to the created Cosmos DB and copy the PRIMARY CONNECTION STRING which is found under the Connection String tab. Browse to the previously created Web App and access the Configuration tab, just hit the “New application setting” button name it DB_CONN and paste the copied connection string as the value.
Our infrastructure is now ready to host our project.
In order to deploy our application we rely on the connectivity between Github (through Github Actions) and Azure. If you navigate to your App Service on the Azure portal you will notice a Deployment center tab, from here you just have to select Github as the Source for continuous deployment. If your Azure account is already linked to your Github account you will be able to access directly to the list of your repositories, select the one to deploy along with the source branch.
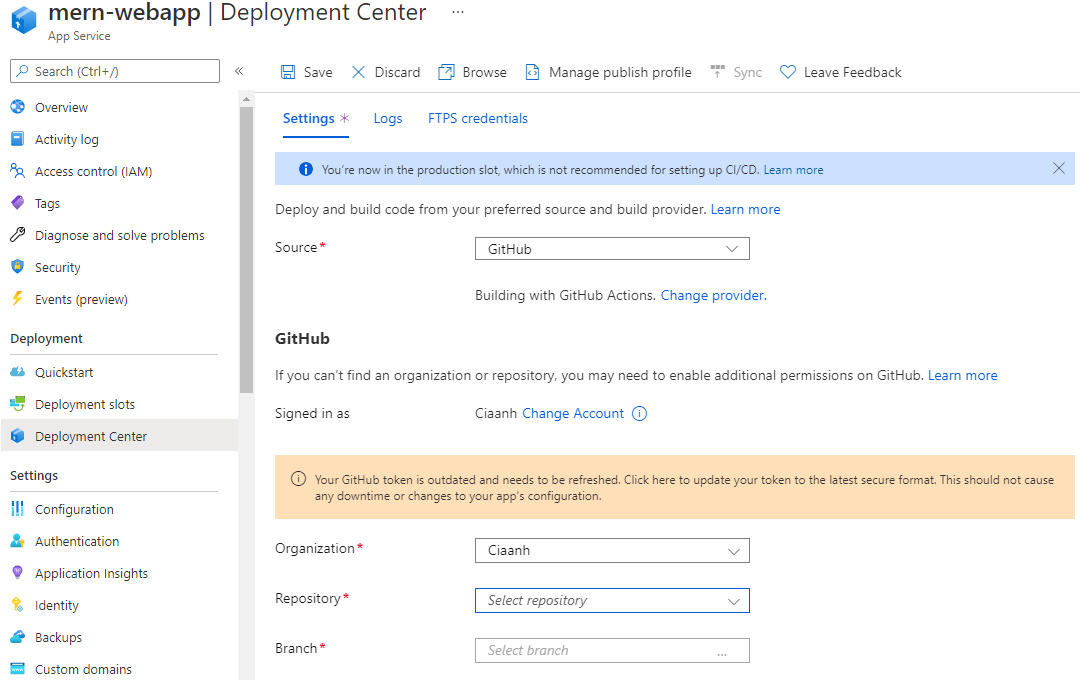
Azure will allow to preview the generated Yaml file which will describe the steps needed for Github Actions to deploy the application. Hit the save button and your done.
If you go on Github you will notice a new folder .github/workflows which contains the Yaml file which has been generated and commited by Azure. On the Actions tab you are also able to view, run and monitor the deployments.
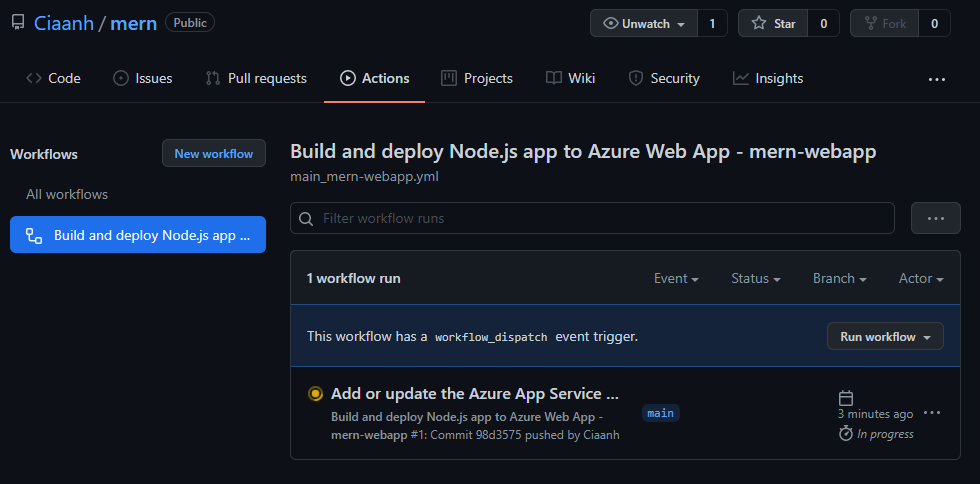
The main issue I encountered was that by default the Build and Deploy processes are seperated into two distinct steps:
Generated Github/Azure Node app Yaml
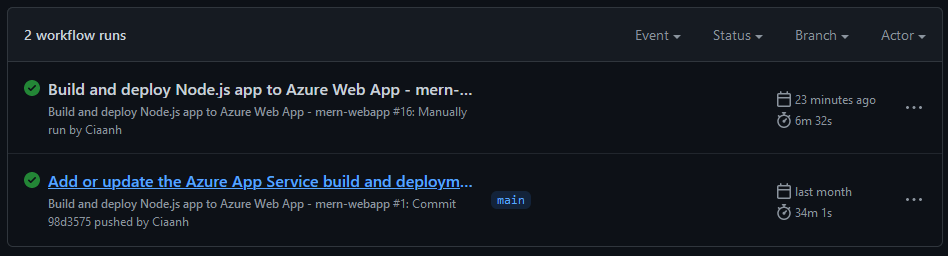
This can look like a good thing but the problem is that artifacts have to be passed between the two steps and the workflows is very long to execute The solution was to merge the build and deploy into one step, the result being to be able to deploy in this Yaml file :
Modified Github/Azure Node app Yaml
Doing this simple change made the action workflow go from 34 minutes to around 6 minutes which is a huge difference, even more when you consider the smal size of the application.
Conclusion ?
As you can see it is really simple to create a JavaScript monolith hosted on Azure to be able to make quicly a small project. Having to search for libraries and make it all work can be time consuming that’s why I wanted to make this article to summarize how this kind of project is structured, why the different libraries are used and list some of the attention points like the default Yaml script for node applications on Github/Azure. The MERN stack on Azure also allow to host a small project for free if you are careful about the fact that “Always On” is not available on Azure for free tier. I hope this artcile would have provided some answers you might have, once again the source code of the application is avaible on Github Ciaanh/Mern.
Do not hesitate to reach out to me if you have any question or comment to improve this article.